Home FAQ

Support

FAQ

FAQ

  • How to enable or disable CE Phone's IP info at Homepage?

    Issue Summary

    On LCD side, CE Phone’s IP info will appear after the account info automatically when the SIP account is registered, but some customers may not want to see this IP information and this FAQ shares the method to enable/disable CE Phone’s IP info at homepage


    Possible Causes

    Configuration adjustment


    How to Resolve

    You can disable the IP info through below method:


    Phone web UI:

    Account -> General -> Allow IP Call

    Enable: IP inform will display after the account.  eg: 1001@10.1.1.1

    Disable: IP info will not display after the account, eg: 1001 


    Auto provision:

    Parameter

    SipPeerToPeerEnabled


    Description

    It enables or disables IP address call feature.
    Note: The parameter can only control the outgoing IP address call. If you don't want to answer the IP address call, you should set the parameter of "SIPPeerFilterEnable" to true

    Permitted Values

    true--enable
    false--disable

    Default

    true

    Web UI

    Account-->General-->Allow IP Call


    More

    If still any issue you meet, please feel free to contact ALE support team for further support at support.alesip@al-enterprise.com.


    Supported Models

    8008 CE/8008G CE/8018S CE/8058S CE/8068S CE/8078S CE


    Firmware Version

    Greater than 1.53.20.3800

  • Where can I find the phone's hardware information?

    • The MAC address, phone model, and series number can be found on the back shell of the phone

  • Where can I find the phone's software version information?

    • On the “Status” page of phone’s WEB UI 

    • In “Settings->Version” on the MMI of CE phones 

    • In “Settings->Version” on the MMI of Halo phones

    • In “Menu->Status” on the MMI of Myriad phones

  • I can't get the IP address from the DHCP server

    • Check if the phone is set to DHCP mode
    • Check if the DHCP service is enabled on the server side
    • Check if there is firewall on the network environment

  • I failed to download the config file

    • Check if the network is reachable between the phone and provisioning server
    • Check if the provisioning URL is correctly set on the phone side
    • Check if the authentication information settings are set correctly on the phone side, and if there is server authentication enabled on the server side

    • Check if the provisioning server is running properly
    • Check if the config file exists on the provisioning server

  • My SIP service failed to register

    • Check if the network is reachable between the phone and the SIP server

    • Check if the following account parameters are correct: SIP Server address, port, username, register name, password

    • Check if the account username and password are were defined correctly on the SIP server

  • Will the ALE headset protect my hearing?

    Yes, it’s safe to use the ALE headset for both consumer and enterprisebusiness applications. ALE headsets come equipped with a acoustic protection technology, safeguarding against that removes acoustic startle events.

    All the ALE headsets protects against acoustic shock by limiting sounds to below 118 dB SPL RMS.

  • What's the quality of the headsets?

    All the ALE headsets have been through strict reliability testing to guarantee customer trouble hassle-free operation of the devices.

  • Can ALE headsets deliver loud-enough sound?

    Before product development, we did a lot of researches based on a large amounthuge numbers of customer feedbacks. The main complaint from the customers iswas about the low sound volume. Customer experience is what we care about most. We've increase the original sound volume within thea healthy hearing limit to enhance user experience.

  • Will audio quality decline as sound volume increases?

    Absolutely not. ALE headsets are equipped with a business-quality level high-definition speaker. We guarantee to deliver a crystal-clear voice as we increase the soundwith the volume increase.

  • What is the difference between the Aries 10 and Aries 20?

    Aries 10 headsets are dedicatedsigned for long time-term use wearing. We focus on improving listening comfort by using larger and thicker ear cushions, as well as lighter materials.

    Aries 20 headsets are dedicated tosigned for business peopleuse, and optimized for various scenarios such as call centers, financial services, online education, and UC services.

  • What should I do if my microphone isn't working when the headset is connected to the computer?

    • Right click - the "sound management" icon on the lower right corner of the screen

    • Click - "sounds"


    • Click - "Recording"


    • Right click your headset and select "Set as Default Device" and “Set as Default communication Device”


    • Confirm that the deadset device is now the default recording device


    • Click "OK", your microphone should work properly now

  • What should I do if my headset playback isn't working when connected to the computer?

    • Right click the "sound management" icon on the lower right corner of the screen


    • Click "Sounds


    • Click"Playback"


    • Right click your headset and select "Set as Default Device"and “Set as Default communication Device”


    • Confirm that the headset is now the default playback device


    • Click "OK", your playback should work properly now. 


  • Phone can't be powered up or reboot cycled

    Issue Summary


    Customers may meet the problem that when connected the phone with power supply, the phone can’t be powered up or reboot cycled.


    Deployment manager may also need to configure the POE switch in order to make sure every phone can boot up fine.


    Possible Causes


    The power supply is not corrected which may cause this issue.


    How to Resolve


    ALE phones support IEEE 802.3af standard and compatible with devices that applied with IEEE 802.3af standard as well. Please see below data:


    More

    If still any issue you meet, please feel free to contact ALE support team for further support at support.alesip@al-enterprise.com.  

    Supported Models

    8008 CE/8008G CE/8018 CE/8058S CE/8068S CE/8078S CE/H2 /H2 P/M3 /M5 /M7

    Firmware Version

    All version

  • How to configure IP address for an ALE phone?

    •Issue Summary

    All IP phones need to get an IP address before using it, this FAQ shares how to configure IP address for an ALE phone


    •Possible Causes

    Phone set up, basic IP configuration


    •How to Resolve

    ALE phones support three methods to set up an IP address:

    Dynamic / Static /Alcatel dyn for Cloud Edition/ Myriad Phone:

    DHCP / Static IP / PPPoE    for Halo phone


    For DHCP / Dynamic mode, phone will send out DHCP discover message to the DHCP server to get an IP address automatically, just make sure the LLDP setting is configured correctly, for phone side, no special settings needed and all phones use this model by default.

    Method to enable/disable the LLDP feature:


    For Static mode, you need to get the IP address from your IT manager and configure manually to the phone side, normally, it is configured on phone side

    Cloud Edition Phone:

    1. Press the right navigation key and switch to Settings, press key “Admin”(password 123456) -> “IP Param” -> “IP Config” -> “IPv4 Settings”

    2.Switch the IP Mode to “Static”, then fill in the corresponding IP information accordingly, then press “OK” to save the configuration


    Myriad Phone:

    1.Press “Menu” -> “Advance Setting”(password 123456) -> “Network” -> “IP Config” -> “IPv4 Settings”

    2.Switch the IPv4 Mode to “Static”, then fill in the corresponding IP information accordingly, then press “OK” to save the configuration


    Halo Phone:

    1.Press “Setting” -> “Admin”(password 123456) -> “IP Param” -> “IP Config” -> “IPv4 Settings”

    2.Switch the Connection Mode to “Static IP”, then fill in the corresponding IP information accordingly, then press “OK” to save the configuration


    For PPPoE mode just for Halo phones, press “Setting” -> “Admin”(password 123456) -> “IP Param” -> “IP Config” -> “IPv4 Settings”. Switch the Connection Mode to “PPPoE”, then fill in the corresponding user name and password accordingly, then press “OK” to save the configuration


    Note:

    All IP configuration change will cause the phone to reboot automatically.

    •More

    If still any issue you meet, please feel free to contact ALE support team for further support at support.alesip@al-enterprise.com.  

    •Supported Models

    8008 CE/8008G CE/8018 CE/8058S CE/8068S CE/8078S CE/H2 /H2 P/M3 /M5 /M7

    •Firmware Version

    All version

  • How to configure VLAN settings for ALE phones?

    •Issue Summary


    The purpose of VLAN configuration on the IP phone is to insert a tag with VLAN information to the packets generated by the IP phone. If VLAN configuration is needed but not configured correctly, phone will not be able to get the IP address correctly.

    This FAQ shares the different ways to configure the VLAN feature for ALE phones

    •Possible Causes


    •How to Resolve

    Customers can configure the VLAN via CDP (Only for Halo Phones), LLDP and DHCP automatically or set it manually.


    CDP (Only for Halo Phones)

    CDP can be configured through phone web UI and Auto provision.

    Web UI Path:

    Auto provision:


    LLDP

    LLDP can be configured through phone web UI ,phone UI and auto provision.

    Web UI Path (Cloud Edition/Myriad phones)

    Web UI (Halo phone)


    Auto provision (Cloud Edition/Myriad phones)


    Auto provision (Halo phones)

    DHCP

    Cloud Edition/Myriad series phones support VLAN discovery via DHCP. The predefined option 43-> option 58 is used to supply the VLAN ID by default.

    Here is an example of DHCP option 58 configuration for VLAN:


    Halo phones support pre-defined option 132 to carry the VLAN ID. You can also define the DHCP option used to carry VLAN ID, details below:


    Configure VLAN Manually

    Web UI (Cloud Edition/Myriad phones)


    Auto provision (Cloud Edition/Myriad phones)

    Web UI (Halo phones)

    Auto provision (Halo phones)


    •More

    If still any issue you meet, please feel free to contact ALE support team for further support at support.alesip@al-enterprise.com.   

    •Supported Models

    8008 CE/8008G CE/8018 CE/8058S CE/8068S CE/8078S CE/H2 /H2 P/M3 /M5 /M7

    •Firmware Version

    All version

  • Phone can't get an IP address

    • Issue Summary

    Customers may meet the problem that when connecting to a switch port, the phone can’t get an IP address automatically.


    • Possible Causes

    Phone Hardware issue

    Phone configuration issue


    • How to Resolve

    1.Connection Test

    Connect a network cable to phone, if it doesn’t work, try the network cable in another network device. If the issue is same, please check the cable and your network environment.

    2.Hardware Test

    Configure a static IP address to the phone and connect a PC to phone PC port, then configure static IP address in PC with the same subnet, if the phone still can’t be accessed it should be a hardware problem. Please contact your vendor or local distributor and send the problem description for help.

    For how to configure static IP, please refer to FAQ “How to configure IP address for an ALE phone”

    3.Configuration Issue

    Try to do a factory reset to the phone and check again. There may be a wrong configuration in the phone. For the method to reset the phone, please refer to FAQ ” How to reset the administrator password”

    If still not work, please check the LLDP and VLAN options (Enable/Disable/VLAN ID) to see whether the issue can be solved or not, for more details, please refer to FAQ “How to configure VLAN settings for ALE phones”


    • More

    If still any issue you meet, please feel free to contact ALE support team for further support at support.alesip@al-enterprise.com.  


    • Supported Models

    8008 CE/8008G CE/8018 CE/8058S CE/8068S CE/8078S CE/H2 /H2 P/M3 /M5 /M7


    • Firmware Version

    All version

  • SIP account registered failed

    Issue Summary

    Phone booted up, but on the LCD side, always show “No Service”


    Possible Causes

    Phone SIP account not configured or registered failed.

    Common error:

    1: User name or register name not correct

    2: Password not correct

    3: SIP server address or outbound server address not configured or incorrect

    4. All account parameters are correct but phone can’t connect to PBX server side


    How to Resolve

    1.Check with your service provider and make sure all necessary SIP account parameters are correct, details below:

    User Name: It is account name provided by SIP PBX for registration

    Register Name: It is an authenticated ID provided by SIP PBX for registration

    Password: It is the authenticated key provided by SIP PBX for registration

    Server Host: It is the server address of PBX provided by SIP PBX for registration

    SIP Server Port: It is the register port provided by SIP PBX for registration

    Outbound Proxy Address: It is the outbound server address if needed


    2.Please try to choose other transport mode(UDP/TCP/TLS) to see if issue solved or not

    3.Please try to register another SIP account to see if it is the account issue.

    3.Please check if your phone network can connect PBX normally or not , you can try to ping the server host to see if it is OK, if no, please connect your IT manager for help first


    More

    If the issue still not solved, please feel free to contact ALE support team for further support at support.alesip@al-enterprise.com.  

    Supported Models

    8008 CE/8008G CE/8018 CE/8058S CE/8068S CE/8078S CE/H2 /H2 P/M3 /M5 /M7

    Firmware Version

    All version

  • Phone registered and unregistered frequently

    Issue Summary

    Customers may meet the situation that the SIP account of the phone registered and after some time, it suddenly unregistered, then registered automatically, switch between them frequently which may cause the call failed at some time.


    Possible Causes

    1.Network not stable

    2.Server side disabled the account

    3.Check with your IT manager to solve the network issue

    4.Set “Keep Alive” parameter to a shorter time like 30


    How to Resolve

    1.Check with your IT manager to solve the network issue

    2.Set “Keep Alive” parameter to a shorter time like 30

    For Halo phones:

        Line -> SIP -> Keep Alive Interval

    For Myriad & Cloud Edition phones:

        This parameter can only be modified through auto provision

    3.Set the “Register Expire Time” parameter to a shorter or longer time

    For Halo phones:

        Line -> SIP -> Register Settings -> SIP Sever 1 -> Registration Expiration:

    For Myriad & Cloud Edition phones:

        Account -> Basic -> Register Expire Time

    Note: Please check with your service provider to see if they have limitation on this as for some PBX, send Register message too frequently will cause the PBX forbidden the account.


    More

    If the issue still not solved, please feel free to contact ALE support team for further support at support.alesip@al-enterprise.com.  

    Supported Models

    8008 CE/8008G CE/8018 CE/8058S CE/8068S CE/8078S CE/H2 /H2 P/M3 /M5 /M7

    Firmware Version

    All version

  • How to adjust default SIP account?

    Issue Summary

    Customers may register more than 1 SIP accounts in one devices. Generally, the account 1 is the default account. But sometimes user needs to switch the default account so that user can make call easily. This FAQ will show you how to adjust the default SIP account.


    Possible Causes


    How to Resolve

    You can change the default SIP account through the web UI of ALE phones, details below:

    1.For Halo phones:

    Phone settings -> Features -> Basic Settings -> Enable Default Line

    Phone settings -> Features -> Basic Settings -> Default Ext Line


    2.For Myriad & Cloud Edition phones:

    Account -> General -> Default Account


    More

    If the issue still not solved, please feel free to contact ALE support team for further support at support.alesip@al-enterprise.com

    Supported Models

    8008 CE/8008G CE/8018 CE/8058S CE/8068S CE/8078S CE/H2 /H2 P/M3 /M5 /M7

    Firmware Version

    All version

  • Phone can't receive any incoming calls

    Issue Summary

    Customers may meet the problem that the SIP account is registered, phone can call out normally, but can’t receive any incoming calls.


    Possible Causes

    Phone enabled DND feature may cause this issue.


    How to Resolve

    1.Check the phone side to see if there is a DND icon on the LCD screen, if yes, just press the DND softkey to disable this feature will solve this issue.

    2.If there is no DND icon on the LCD screen, please check with your service provider to see if the DND feature of this SIP account is enabled on the server side and ask them to disable it will solve this issue.


    More

    If the issue still not solved, please feel free to contact ALE support team for further support at support.alesip@al-enterprise.com.

    Supported Models

    8008 CE/8008G CE/8018 CE/8058S CE/8068S CE/8078S CE/H2 /H2 P/M3 /M5 /M7

    Firmware Version

    All version

  • Phone can't make outgoing call

    Issue Summary 

    This FAQ shares different reasons cause the situation that phone could not make outgoing call and the corresponding solutions.


    Possible Causes

    1.SIP account not configured or registered failed

    2.Network issue

    3.SIP server limitation

    4.Please make sure that your SIP account is registered, if no, please refer to FAQ


    How to Resolve

    1.Please make sure that your SIP account is registered, if no, please refer to FAQ

    ” SIP account registered failed”

    2.If the account is registered fine, please check with your IT manager to see if there is any problem with the network during your call out.

    3.Please check with your service manager to see if any additional prefix needed to meet the SIP trunk rules when calling out, for example:

    Add 9 before the number when calling external numbers

    Add 8 before the extension when call xx department


    More

    If the issue still not solved, please feel free to contact ALE support team for further support at support.alesip@al-enterprise.com.

    Supported Models

    8008 CE/8008G CE/8018 CE/8058S CE/8068S CE/8078S CE/H2 /H2 P/M3 /M5 /M7

    Firmware Version

    All version

  • How to set up a local 3-way conference call?

    Issue Summary

    This FAQ shared the quick steps to set up a local 3-way conference call with ALE phones.


    Possible Causes


    How to Resolve

    1.Device information:

    Phone A with SIP account A

    Phone B with SIP account B

    Phone C with SIP account C

    Phone A will set up the local 3-way conference call


    2.Steps:

    A calls B, B answers, A and B establish a call

    A press “Conf”(for Halo&Myriad phones ) or “Conference”(for Cloud Edition phones) key

    A dials C, C answers, A and C establish a call

    A press the “Conf” or “Conference” key again to establish a local 3-way conference call


    The same steps for all other parties.


    More

    If still any issue you meet, please feel free to contact ALE support team for further support at support.alesip@al-enterprise.com.

    Supported Models

    8008 CE/8008G CE/8018 CE/8058S CE/8068S CE/8078S CE/H2 /H2 P/M3 /M5 /M7

    Firmware Version

    All version

  • How to transfer a call with ALE phones?

    Issue Summary

    Cloud Edition/ Myriad /Halo IP phones support call transfer using the REFER method specified in RFC 3515 and offer three types of transfer:

    Blind Transfer -- Transfer a call directly to another party without consulting. Blind transfer is implemented by a simple REFER method without Replaces in the Refer-To header.

    Attended Transfer (Consultative Transfer) -- Transfer a call with prior consulting. Attended transfer is implemented by a REFER method with Replaces in the Refer-To header.

    Semi-attended Transfer (Consultative Transfer) -- Transfer a call when the third party is ringing. Semi-attended transfer is implemented by a REFER method with Replaces in the Refer-To header.


    This FAQ shares the detailed steps of theses 3 kinds of transfer mode via ALE phones.


    Possible Causes


    How to Resolve

    Cloud Edition Phone :

    1.Blind Transfer call:

    A and B establish a call

    A press “Transfer to” key and input the number of C

    A press “OK” key or Dial out key to finish the blind transfer process

    2.Consultative Transfer call:

    A and B establish a call

    A press “New Call” key and input the number of C

    A and C establish a call

    A press “Transfer” key to finish the consultative transfer process

    3.Semi-consultative Transfer call:

    A and B establish a call

    A press “New Call” key and input the number of C

    C rings but not answer the call, A hear the ring back

    A press “Transfer” key to finish the semi-consultative transfer process


    Myriad Phone:

    1.Blind Transfer call:

    A and B establish a call

    A press “Transfer” key and input the number of C

    A press “B Trsf” key to finish the blind transfer process

    2.Consultative Transfer call:

    A and B establish a call

    A press “Transfer” key and input the number of C

    A press “OK” key or “Call” or “#” key

    A and C establish a call

    A press “Transfer” key to finish the consultative transfer process

    3.Semi-consultative Transfer call:

    A and B establish a call

    A press “Transfer” key and input the number of C

    A press “OK” key or “Call” or “#” key

    C rings but not answer the call, A hear the ring back

    A press “Transfer” key to finish the semi-consultative transfer process


    Halo Phone:

    1.Blind Transfer call:

    A and B establish a call

    A press “XFER” key and input the number of C

    A press “XFER” key again to finish the blind transfer process

    2.Consultative Transfer call:

    A and B establish a call

    A press “XFER” key and input the number of C

    A press “OK” key or “Dial” or “#” key

    A and C establish a call

    A press “XFER” key to finish the consultative transfer process

    3.Semi-consultative Transfer call:

    A and B establish a call

    A press “XFER” key and input the number of C

    A press “OK” key or “Dial” or “#” key

    C rings but not answer the call, A hear the ring back

    A press “XFER” key to finish the semi-consultative transfer process


    More

    There is some PBX that not support Blind transfer, if you transfer the call failed, it is advised to check with your service provider first to see if they support it or not.

    If still any issue you meet, please feel free to contact ALE support team for further support at support.alesip@al-enterprise.com.

    Supported Models

    8008 CE/8008G CE/8018 CE/8058S CE/8068S CE/8078S CE/H2 /H2 P/M3 /M5 /M7

    Firmware Version

    All version

  • How to set up local forward features with ALE phones?

    Issue Summary 

    Cloud Edition/ Myriad /Halo IP phones support call forward feature which can help customers to forward its incoming call to the target number whenever the conditions are met. There are 3 kind of mode ALE phones support:

    Always Forward (Immediate)

    Busy Forward (Busy)

    No Answer Forward (No Reply)


    This FAQ shares the detailed steps to configure theses 3 kinds of forward via ALE phones.


    Possible Causes


    How to Resolve

    Cloud Edition Phone :

    Phone LCD Menu Path (Use the Right and Down navigation key):

    Settings -> Phone -> Forward

    Immediate:       Press “Active” key, then press “Number’ key to fill in the target number

    Busy:            Press “Active” key, then press “Number’ key to fill in the target number

    No Reply:        Press “Active” key, then press “Number’ key to fill in the target number


    Myriad Phone:

    Phone LCD Menu Path:

    Menu -> Features -> Call Forward

    Always Forward:       Switch to “Enabled” and fill in the “Forward To” number

    Busy Forward:         Switch to “Enabled” and fill in the “Forward To” number

    No Answer Forward:    Switch to “Enabled” and fill in the “Forward To” number


    Halo Phone:

    There is no LCD menu to configure this feature, only through phone web UI

    Web UI Path: Line -> SIP -> Basic Settings


    More

    If still any issue you meet, please feel free to contact ALE support team for further support at support.alesip@al-enterprise.com.

    Supported Models

    8008 CE/8008G CE/8018 CE/8058S CE/8068S CE/8078S CE/H2 /H2 P/M3 /M5 /M7

    Firmware Version

    All version

  • How to check the status of ALE phones?

    Issue Summary

    Some customer needs to know how to quickly get the phone basic information like MAC address, IP address, version information etc. this FAQ will help you.


    Possible Causes


    How to Resolve

    For Halo phones:

    Press the OK key will get the phone status information, detailed below:

    Note: for the MAC/Hardware/Software version, please go to Setting -> Version


    For Myriad phones:

    Press the OK key will get the phone status information, detailed below:


    For Cloud Edition phones:

    You can get the account status on the home page

    Press the Left navigation key to the Setting page, then press Version key to get the version information

    Press the Left navigation key to the Setting page, then press Network key to get the IP information and the MAC address of the phone


    More

    If still any help needed, please feel free to contact ALE support team for further support at support.alesip@al-enterprise.com.

    Supported Models

    8008 CE/8008G CE/8018 CE/8058S CE/8068S CE/8078S CE/H2 /H2 P/M3 /M5 /M7

    Firmware Version

    All version

  • How to upgrade ALE phone binary?

    Issue Summary                                                                         

    This FAQ shows how to upgrade ALE phone binary


    Possible Causes


    How to Resolve

    There are three methods to upgrade the ALE phone binary:

    1.Through phone web UI

    1)Download the binary that you will use to upgrade

    2)Log into the phone web UI by typing the IP address of the phone on the address bar of your web browser with https format, for example: https://10.10.1.1/ the default user name is “admin” while the password is “123456”

    3)Go to the path:

    For Halo phones:

        Status -> Upgrade -> Software upgrade

    For Myriad & Cloud Edition phones:

    Maintenance -> Binary Update -> Upload Binary Files(sip*):

    4)Click ”Select” to select the binary file

    5)Click “Update” to start the upgrade process

    Note:

    Do not refresh the page or close the browser!Otherwise the upgrade will fail!

    Do not unplug the network cables and power cables when the IP phone is upgrading firmware.


    2.Through auto provision

    You can use this parameter in your provision template to trigger the phone to upgrade the binary:

    For Halo phones:


    For Myriad & Cloud Edition phones:

    3.USB Upgrade

    1)Prepare a moveable USB disk with FAT32 format

    2)Create a folder and name it “upgrade”

    3)Copy the firmware binary files in upgrade folder

    4)Plug U disk into the phone’s USB port

    5)Power on the phone

    6)For Cloud Edition phones during step 1 of initialization process, pressing   “4”+”7”+”8”+”i” keys at the same time. 

    For 8018 phone, pressing “4”+”7”+”8”+”123<>abc” keys at the same time.

    For Myriad series phones during step 1 of initialization process, pressing “4”+”7”+”8”+”*” keys at the same time.


    Release all keys until all the LEDs are lighted on.

    7)Phone will reboot and enter upgrading process.

    Note:

    8008 CE phone and H2/H2P phone does not support this method.


    More

    You can download the latest firmware online at http://www.aledevice.com/site/download


    The following table lists the associated and latest firmware name for each IP phone model.

    Supported Models

    8008 CE/8008G CE/8018 CE/8058S CE/8068S CE/8078S CE/H2 /H2 P/M3 /M5 /M7

    Firmware Version

    All version

  • What is the pinout of ALE phone headset port?

    Issue Summary

    All ALE Phones support wired headset and different customers may use different headset, so the pinout type of headset port is the needed info for the customer to choose the suitable headset.


    Possible Causes


    How to Resolve

    The pinout of different phones is different, details below:


    More

    If still any help needed, please feel free to contact ALE support team for further support at support.alesip@al-enterprise.com.

    Supported Models

    8008 CE/8008G CE/8018 CE/8058S CE/8068S CE/8078S CE/H2 /H2 P/M3 /M5 /M7

    Firmware Version

    All version


  • How to set up the voice mail feature of ALE phones?

    Issue Summary

    Cloud Edition/ Myriad /Halo IP phones support voice mail feature which can help caller to receive messages when callee is not available.


    This FAQ shares the detailed steps to set up the voice mail feature of ALE phones


    Possible Causes


    How to Resolve

    Cloud Edition Phone :

    Phone Web UI path:

    Account -> Advanced -> Voice Mail Number:

    Phone LCD path:

    There are no settings on LCD side to configure the Voice Mail Number, and you need to configure the voice mail number on wed UI before using this feature, but you can also dial the Voice Mail Number directly to access the voice mail.


    Myriad Phone:

    Phone Web UI path:

    Account -> Advanced -> Voice Mail Number:

    Phone LCD path:

    Menu -> Voicemail -> Set Voicemail Number

    You can also dial the Voice Mail Number directly to access the voice mail.


    Halo Phone:

    Phone Web UI path:

    Line -> SIP -> Basic Settings -> Voice Message Number

    Phone LCD path:

       Press the Voicemail hard key -> Select Line, press OK -> Voice Mail(Enabled) -> Number


    More

    If still any issue you meet, please feel free to contact ALE support team for further support at support.alesip@al-enterprise.com.  

    Supported Models

    8008 CE/8008G CE/8018 CE/8058S CE/8068S CE/8078S CE/H2 /H2 P/M3 /M5 /M7

    Firmware Version

    All version

  • How to add local phone book contact of ALE phones?

    Issue Summary

    This FAQ shares the detailed steps to add contacts to the local phone book of ALE phones


    Possible Causes


    How to Resolve

    Cloud Edition Phone :

    Phone Web UI path:

    Directory -> Local Directory -> Add, fill in the corresponding items needed

    Phone LCD path:

    Use Left or Right Navigation Key to Contact -> All Contacts -> OK -> New, fill in the corresponding items needed, you can long press the hard key “”to switch the input method between “123” & “abc” or use hard key “123<>abc” directly


    Myriad Phone:

    Phone Web UI path:

    Directory -> Local Directory -> Add, fill in the corresponding items needed

    Phone LCD path:

    Menu -> Directory -> Local Directory -> Add, fill in the corresponding items needed


    Halo Phone:

    Phone Web UI path:

    Phonebook -> Contacts -> Contact List -> Add new contact, fill in the corresponding items needed

    Phone LCD path:

    More-> Dir -> Local Contacts-> Add, fill in the corresponding items needed


    More

    If still any issue you meet, please feel free to contact ALE support team for further support at support.alesip@al-enterprise.com.  

    Supported Models

    8008 CE/8008G CE/8018 CE/8058S CE/8068S CE/8078S CE/H2 /H2 P/M3 /M5 /M7

    Firmware Version

    All version

  • How to set up the correct time for your ALE phones?

    Issue Summary

    Time & Date is the normally setting that customer may use when setting up a phone. This FAQ shares the steps to configure it in ALE phones


    Possible Causes


    How to Resolve

    ALE phones maintain a local clock. You can choose to get the time and date from SNTP (Simple Network Time Protocol) time server to have the most accurate time and set DST (Daylight Saving Time) to make better use of daylight and to conserve energy, or you can set the time and date manually. The time and date can be displayed in several formats on the idle screen. The detailed settings showed below:


    Cloud Edition Phone:

    Phone Web UI path:

    Setting -> Time, fill in the corresponding items needed

    Phone LCD path:

    Use Left or Right Navigation Key to Settings -> Phone -> Date -> Local time, fill in the corresponding items needed. The format details below:

    Date: YYYY/MM/DD

    Time: H:M:S

    Note:

    1.Y for Year / MM for Month / D for Day / H for Hour / M for Minute / S for Second

    2./ switch to abc input mode, press * key 3 times

    3.: switch to abc input mode, press * key 5 times


    Myriad Phone:

    Phone Web UI path:

    Setting -> Time, fill in the corresponding items needed

    Phone LCD path:

    Menu -> Basic Setting -> Time and Date, switch to select the value you needed, it can only change the format of the “Date(YYY-MM-DD .etc.)” & “Time(24 Hour/12 Hour)”, for other parameter, please configure it on the phone web UI.


    Halo Phone:

    Phone Web UI path:

    Phone settings -> Time/Date, all settings here, just modify the one you needed

    Phone LCD path:

    There are no options on phone LCD side for time & date settings


    Note: for manual time, once the phone is rebooted, the manual set time will be reset to the original one


    More

    If still any issue you meet, please feel free to contact ALE support team for further support at support.alesip@al-enterprise.com.  

    Supported Models

    8008 CE/8008G CE/8018 CE/8058S CE/8068S CE/8078S CE/H2 /H2 P/M3 /M5 /M7

    Firmware Version

    All version

  • How to reset the administrator password?

    Issue Summary

    Administrator password is used to login phone web UI or the advanced settings on phone LCD side, but for some management requirements, this password is just for the phone manager, what can we do if the admin password has been changed and forgotten?

    This FAQ shares the steps to configure it in ALE phones


    Possible Causes

    1.Customers changed the password but forget it.

    2.Administrator changed but password is missed

    3.The default password of this version is not “123456”


    How to Resolve

    1.Check with your phone provider to see if there is any default password changed.

    2.If there is no special default password, please try to factory reset the phones to get the default password:

    Cloud Edition Phone:

    During boot up phase step 1, press key 1,3,7,9 at the same time, then input “*46*46*253*” to reset the phone to factory settings.


    Myriad Phone:

    You can long press the “Conference” hard key for 10 seconds, then press “OK” to reset the phone to factory settings.


    Halo Phone:

    You can long press the “OK” hard key for 8 seconds, then press “OK” to reset the phone to factory settings.


    Note:

    Reset to Factory will clear all the configuration of the phone, if you don't know how to configure it, please kindly connect your phone provider for help first.


    More

    If still any issue you meet, please feel free to contact ALE support team for further support at support.alesip@al-enterprise.com.  

    Supported Models

    8008 CE/8008G CE/8018 CE/8058S CE/8068S CE/8078S CE/H2 /H2 P/M3 /M5 /M7

    Firmware Version

    1.52.01.2555 or higher version for 8008 CE/8008G CE/8018 CE/8058S CE/8068S CE/8078S CE

    2.10.16.1234 or higher versin for M3 /M5 /M7

  • How to change the phone local ringtone?

    Issue Summary

    For the ringing for incoming calls, different customers may like different rings, normally it is a personal setting, and sometimes, customers may have questions below:

    1.Phone doesn’t ring the correct ring tone you set locally

    2.There is some external Beep before the phone rings, but you don’t want that

    3.How to make the phone rings with headset when you use a headset


    This FAQ shares the method to adjust the local incoming ring tone through ALE phone LCD side including below options:

    1.Adjust ring tones

    2.Adjust ring mode

    3.Adjust Beep options

    4.Adjust ring device


    Possible Causes

    1.Ring tone and ring mode being modified

    2.The incoming call match the distinctive ring tones

    3.Beep options being changed


    How to Resolve

    Cloud Edition Phone:

    1.Press the right navigation key and switch to Settings, press key “Phone” -> “Ringing”

    2.Press “Int Melody” key to configure the internal calls, the supported ringtone will list, press the corresponding hard keys to select it and press “OK” key to save the configuration.

    3.Press “Ext Melody” key to configure the External calls from server side, the supported ringtone will list, press the corresponding hard keys to select it and press “OK” key to save the configuration.

    4.Press “Ring Mode” key to configure the different ringing mode you want:

       Normal ringing:    phone will ring with a fixed volume

       Progressive ringing: phone will ring with a dynamic volume from low to loud

       Silent mode:       Phone will ring with no voice

    5.Press “Beep” key to configure the different beep options you want:

       1 beep before ring / 3 beep before ring / Ring without beep

    6.Press “Ring Device” key to configure the different ring device when you enabled the headset mode:

       Handsfree: In headset mode, phone will ring with the speaker

       Headset:  In headset mode, phone will ring with the headset

       HF+HE:   In headset mode, phone will ring with the speaker & headset at the same time


    Myriad Phone:

    1.Press “Menu”-> ”Basic Setting” -> “Sound” -> “Ringing”

    2.Press “Int Melody” key to configure the internal calls, the supported ringtone will list, select it and press “OK” key to save the configuration.

    3.Press “Ext Melody” key to configure the External calls from server side, the supported ringtone will list, select it and press “OK” key to save the configuration.

    4.Press “Ring Mode” key to configure the different ringing mode you want:

       Normal ringing:    phone will ring with a fixed volume

       Progressive:       phone will ring with a dynamic volume from low to loud

       Silent mode:       Phone will ring with no voice

    5.Press “Beep” key to configure the different beep options you want:

       0 beep / 1 beep / 3 beep

    6.Press “Ring Device” key to configure the different ring device when you enabled the headset mode:

       Handsfree: In headset mode, phone will ring with the speaker

       Headset:  In headset mode, phone will ring with the headset

       HF+HE:   In headset mode, phone will ring with the speaker & headset at the same time


    Halo Phone:

    1.Press “Setting”-> ”Phone” -> “Ringing” -> “Ring Type”

    2.Adjust to select the ring tone you want and press “OK” key to save it

    3.For “Ring mode” & “Beep”, Halo phones don’t support for now

    4.For “Ring Device” & “Silent Mode”, you can configure them through web UI: “Phone Settings” -> “Features” -> “Basic Settings”

    Note:

    The ring tone priority from high to low is: distinctive ring tones -> local ring tones


    More

    If still any issue you meet, please feel free to contact ALE support team for further support at support.alesip@al-enterprise.com.

    Supported Models

    8008 CE/8008G CE/8018 CE/8058S CE/8068S CE/8078S CE/H2 /H2 P/M3 /M5 /M7

    Firmware Version

    All version

  • How to change the phone LCD language?

    Issue Summary

    Different customers may like to use different language on phone LCD side, this FAQ shares the method to quick adjust the phone LCD Language


    Possible Causes


    How to Resolve

    Cloud Edition Phone:

    1.Press the right navigation key and switch to Settings, press key “Phone” -> “Language”

    2.The supported language will list, press the corresponding hard keys to select it and press “OK” key to save the configuration.


    Myriad Phone:

    1. Press “Menu”-> ”Basic Setting” -> “Language”

    2.The supported ringtone will list, select it and press “OK” key to save the configuration.


    Halo Phone:

    1. Press “Setting”-> ”Phone” -> “Language”

    2.The supported ringtone will list, select it and press “OK” key to save the configuration.


    More

    If still any issue you meet, please feel free to contact ALE support team for further support at support.alesip@al-enterprise.com.

    Supported Models

    8008 CE/8008G CE/8018 CE/8058S CE/8068S CE/8078S CE/H2 /H2 P/M3 /M5 /M7

    Firmware Version

    All version

  • How to do mass deployment for ALE phones with EPS?

    Issue Summary

    EPS (Easy Provisioning Server) provides Web-based equipment deployment service for customer using Alcatel-Lucent phones. Customer can add, delete, and mass import the phones that need to be deployed. At the same time, customers can generate different configuration template files for different models, and apply it to one or a batch of phones. Customers can also manually push the configuration file to the designated phone terminal to complete the automatic deployment.

    This FAQ shares the steps of the whole deployment process.


    Possible Causes

    New phones deployment


    How to Resolve

    There are 4 steps for the phone deployment with EPS:

    1.Mass import the phones and their accounts information to EPS

    2.Add phones’ common settings

    3.Add phones’ upgrade settings

    4.Push configuration from EPS to phone side


    Detailed information below:

    1.Mass import the phones and their accounts information to EPS

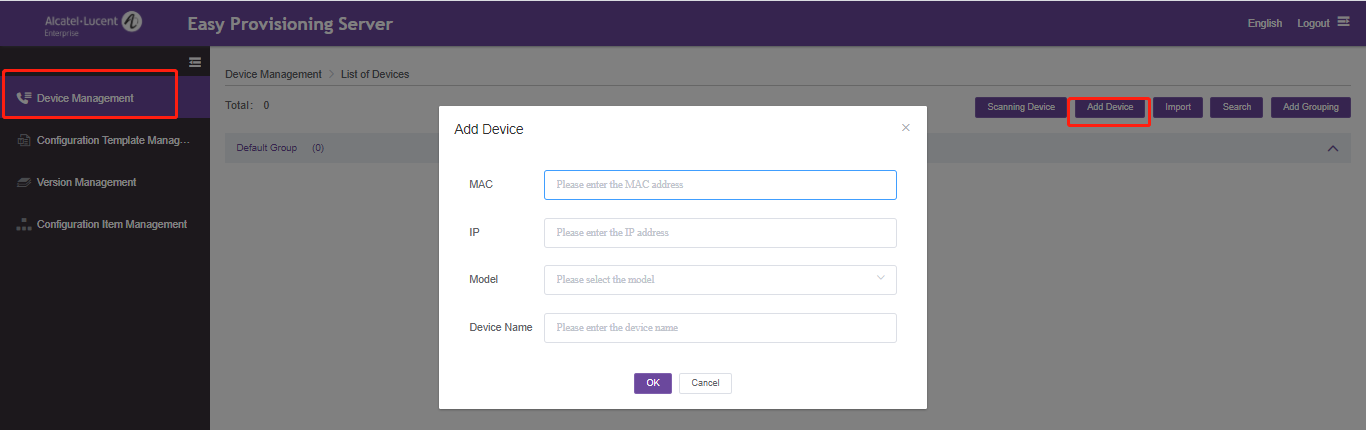
    1)Login EPS, go to “Device Management” -> “Add Device”

    2)Select one device from your list for deployment, in order to get the first sample file


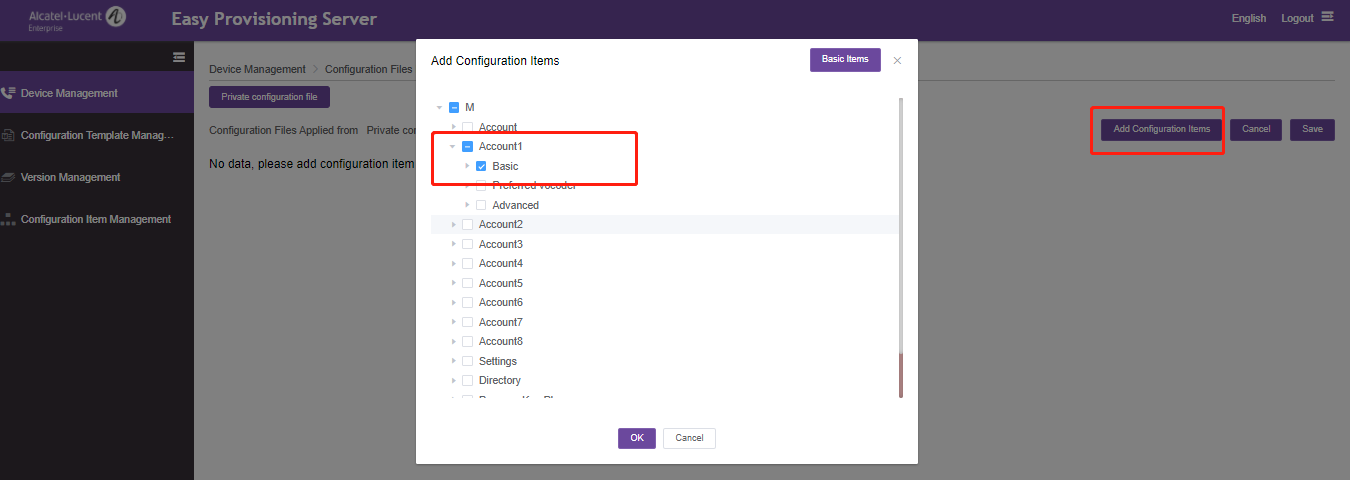
    3)After the sample phone added, select this device and click “Configuration Files”

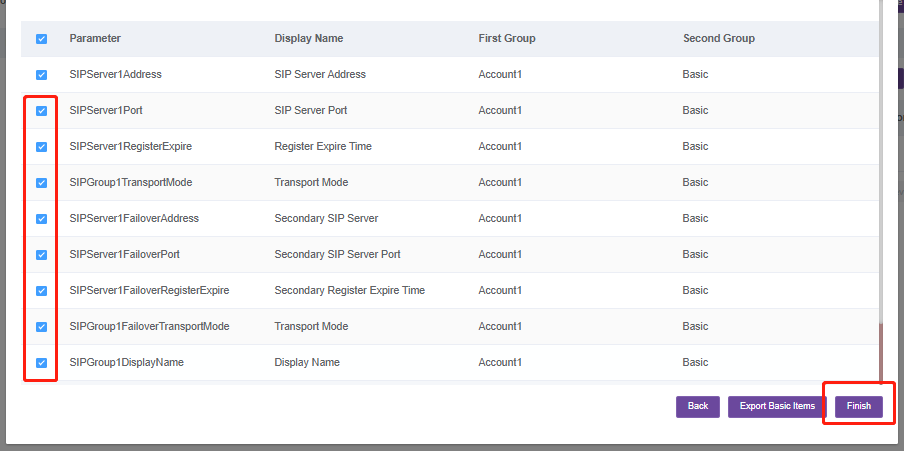
    4)Click ”Add configuration Items”, then select the account settings that you need to use in order to register a SIP account and then save it. It is advised to just select the exact items needed,and just left the irrelated items unselected.

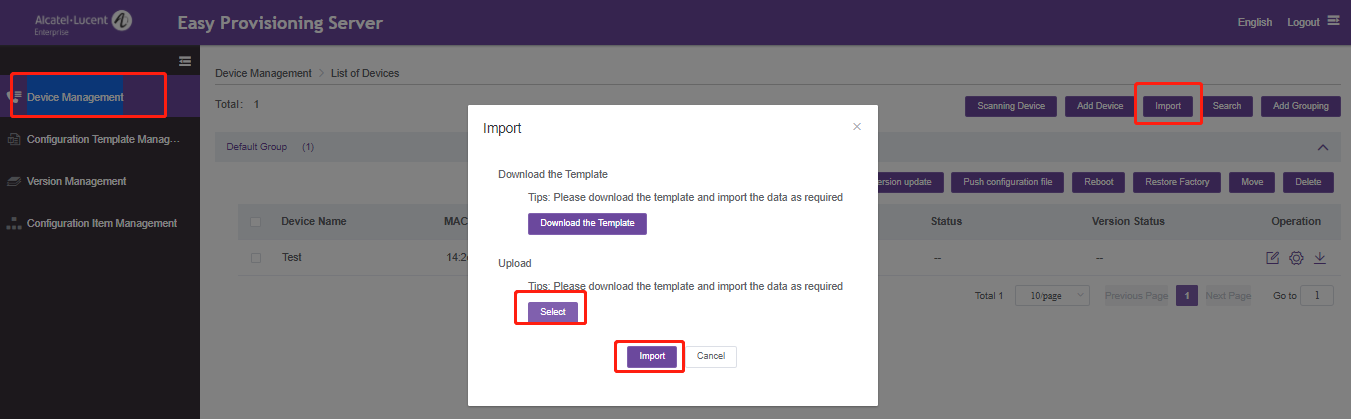
    5)Go back to “Device Management”, then click “Import” -> “Download the Template”, select the product series, click OK, then select the sample device that you just added,

    6)Click “Next”, and then select all parameters that will be used, click “Finish” to download this sample file.

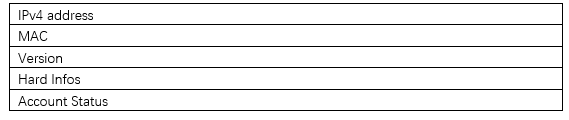
    7)Open the downloaded file and edit it with the phone and SIP account information, MAC addresses will be provided by your phone provider and SIP account information will be provided by your service provider.

    At the same time, the format of all data should be the same as line 3

    8)After all information edit correctly, go to EPS “Device Management” -> “Import” -> “Select”, upload this file and then click “Import” to finish

    2.Add phones’ common settings

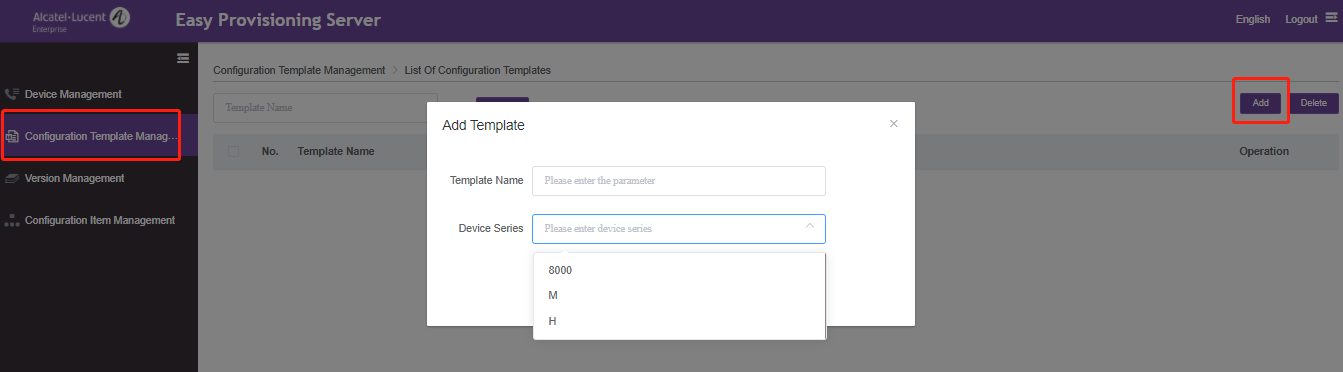
    1)Login EPS, go to “Configuration Template Management” -> “Add”

    2)Input the template name and select the phone model series

    3)Select this template and click “Edit”

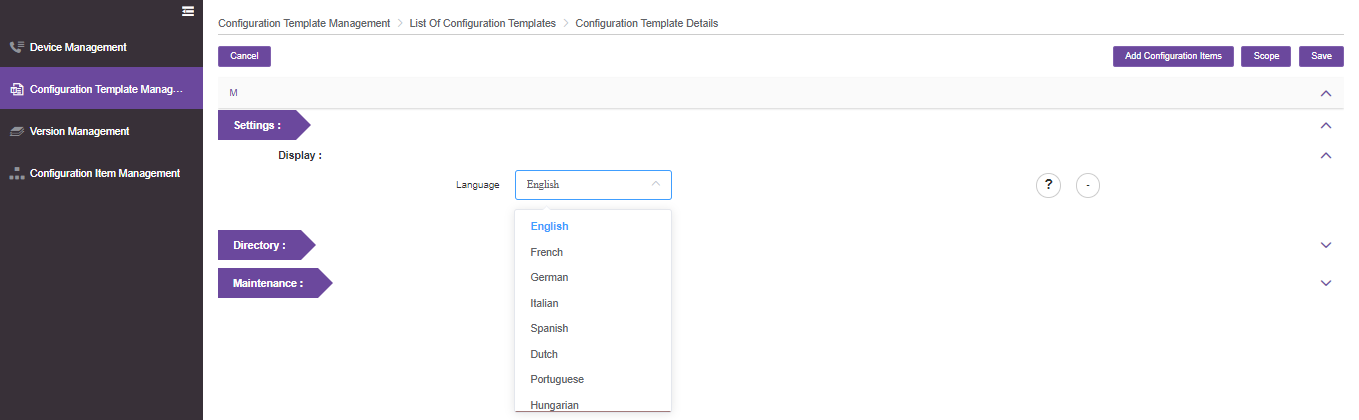
    1)     Click ”Add configuration Items”, then select the common settings that you need, like language , directory settings and then save it. It is advised to just select the exact items needed, and just left the irrelated items unselected.

    5)Click “OK”, then you will see all the settings you selected, you can configure details in this page

    6)After all common settings configured, click “Scope” button and select the devices that will use these parameters

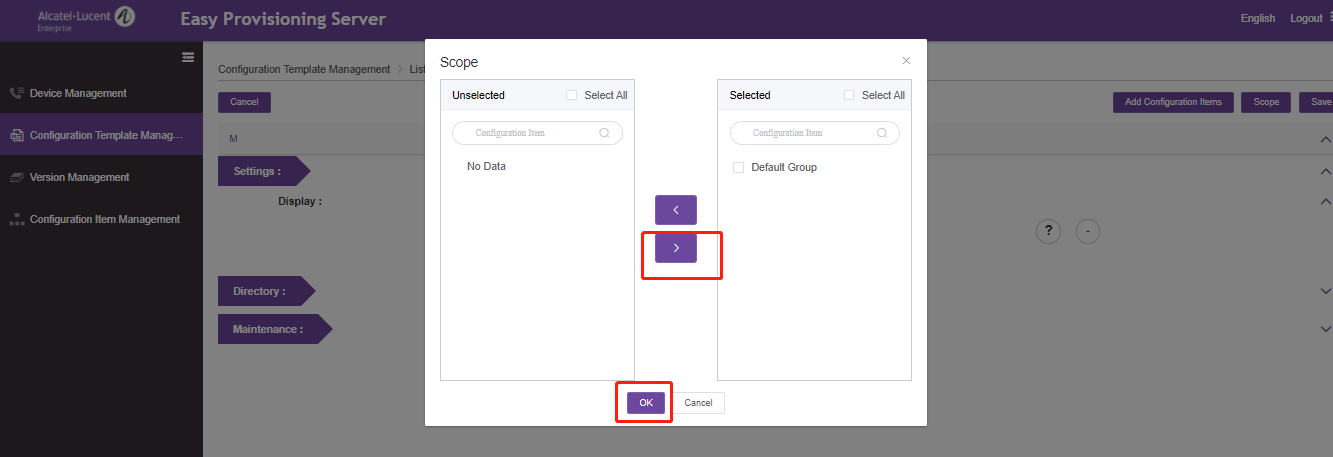
    7)Click “Save” to finish

    3.Add phones’ upgrade settings

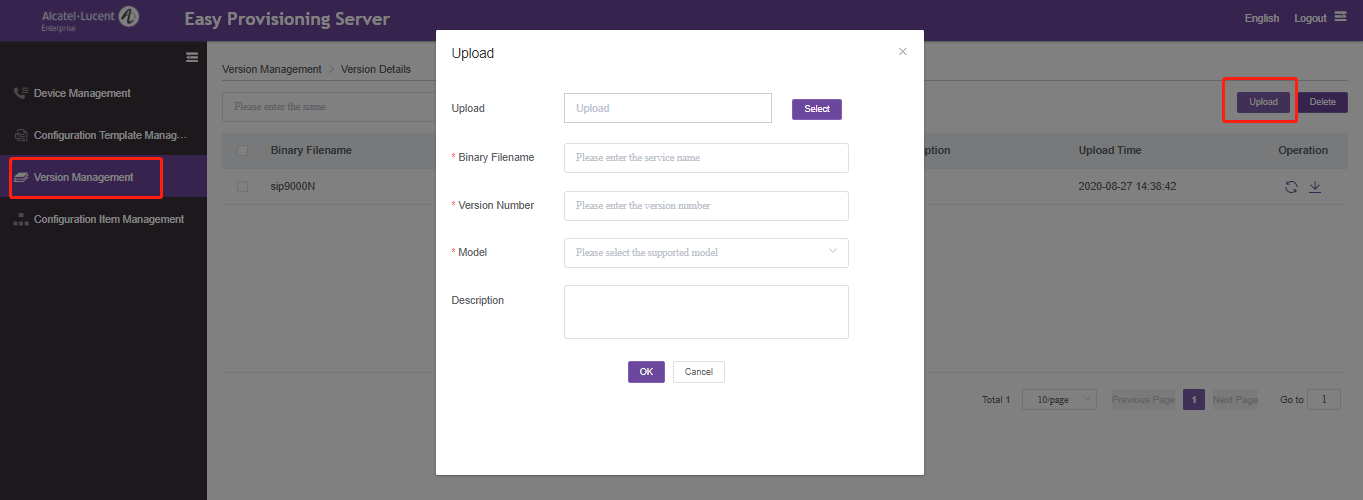
    1)Login EPS, go to “Version Management” -> “Upload”, then upload the firmware file and fill in the corresponding information needed.

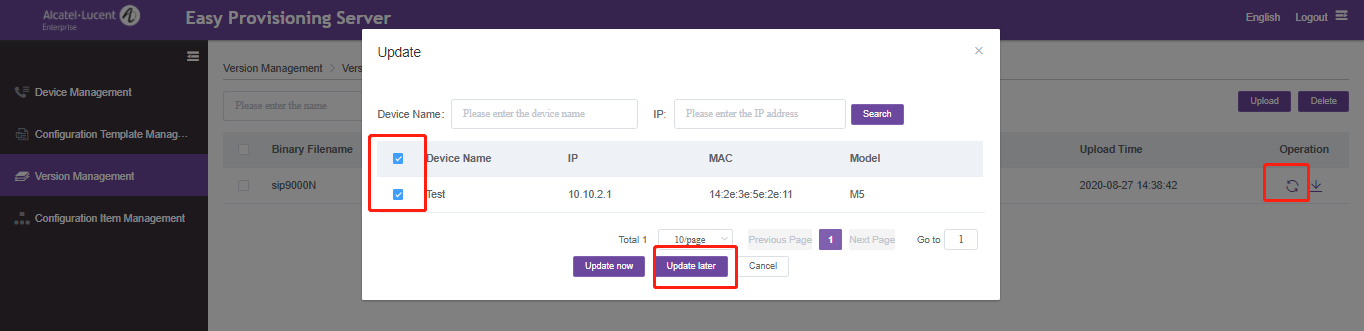
    2)After firmware uploaded, click “Update”, select the devices that need this new firmware and then click “update later” to add the upgrade parameter to the template file.

    4. Push configuration from EPS to phone side

    1)Power on the phones that need to be deployed, record the IP subnet information

    2)Login EPS, go to “Device Management” -> “Scanning Device”

    3)Input the IP range and click “Device Scanning” to search these devices, you can add more than one IP range and EPS can support scan in different VLANs.

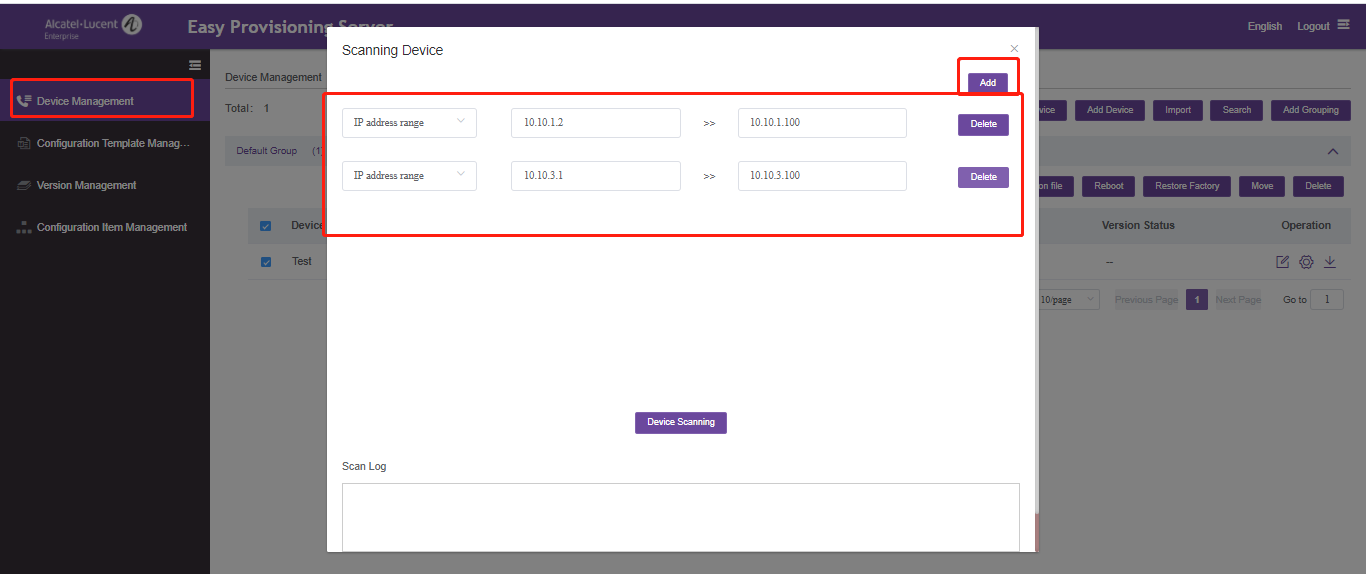
    4)After the scan, just select the devices and click “OK” to add them to EPS, the configuration files will be matched automatically according to the MAC addresses.

    5)At last, just select the phones added and then press “Push configuration file” to push the files to the corresponding phones and finish the deployment process.
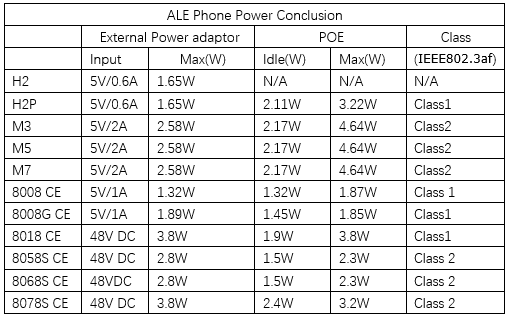
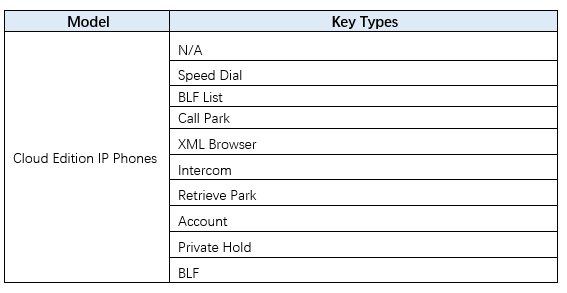
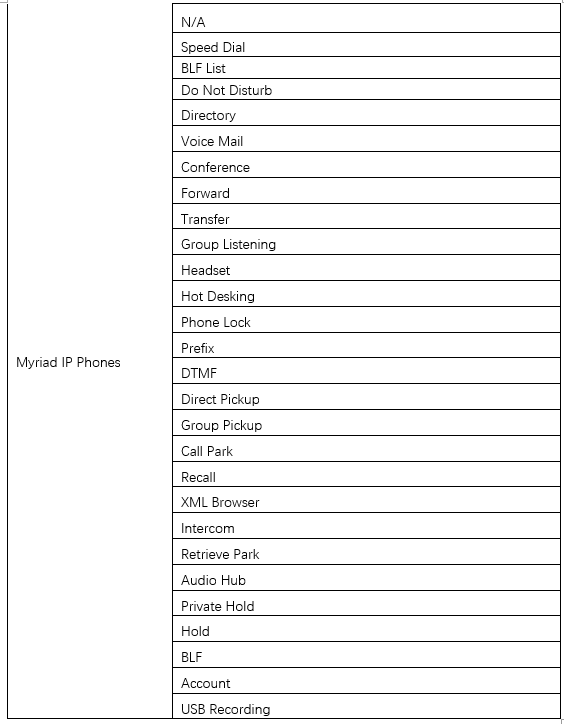
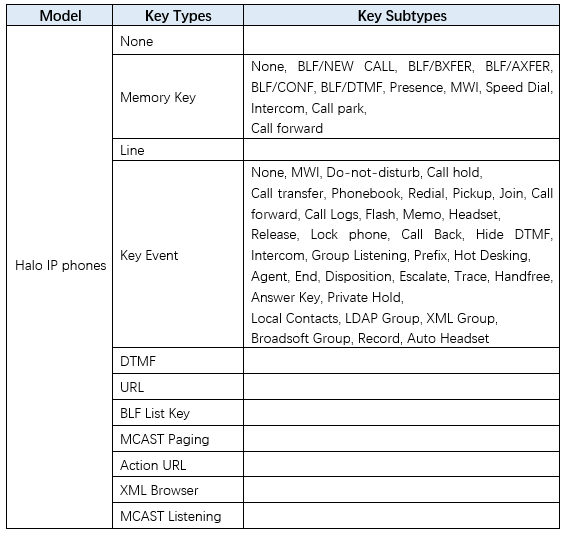
     

    More

    If still any issue you meet, please feel free to contact ALE support team for further support at support.alesip@al-enterprise.com.  

    Supported Models

    8008 CE/8008G CE/8018 CE/8058S CE/8068S CE/8078S CE/M3 /M5 /M7

    Firmware Version

    For Myriad phones:           Version 2.10.16.1234 or later

    For Cloud Edition phones:      Version 1.53.31.4058 or later


  • How to configure the programmable key of ALE Phones?

    Issue Summary

    Users can customize programmable keys on the phone to access usually used functions like BLF, Speed dial etc. This FAQ shares the method to quick set up a programmable key with Speed dial and BLF.


    Possible Causes


    How to Resolve

    Cloud Edition Phone:

    1.Press the right navigation key and switch to Program Key

    2.Select one key and long press it for 2 seconds, then you will see the Type option, default value is “N/A”

    3.Press “Type”, then all supported type will list automatically

    4.For “Speed Dial”, select it in the type list, then press “OK” key and then fill in the corresponding information needed, the “Value” is the number you need to do speed dial.

    5.For “BLF”, select it in the type list, then press “OK” key and then fill in the corresponding information needed, the “Value” is the extension you need to modify, the “Extension” is the pickup code used to pick up a call if needed.

    6.Press “OK” key to save the configuration.


    Myriad Phone:

    1.Select one key and long press it for 2 seconds, then you will see the Key Type option, default value is “Undefined”

    2.Press the Right or Left navigation key to switch the Key Type to the one you need like “Speed Dial” or “BLF”

    3.When the key type is changed to “Speed Dial”, the corresponding information needed will list automatically, the “Value” is the number you need to do speed dial.

    4.When the key type is changed to “BLF”, the corresponding information needed will list automatically, the “Value” is the number you need to monitor, the “Extension” is the pickup code used to pick up a call if needed.

    5.Press “OK” key to save the configuration.


    Halo Phone:

    1.There are totally 2 keys can be programable set, just select one key and long press it for 2 seconds, then you will see the Type option, default value is “Line”

    2.Press the Right or Left navigation key to switch the Type to “Memory Key”

    3.Press the Down navigation key, you will see the Subtype option.

    4.Press the Right or Left navigation key to switch the Type to “Speed Dial” or “BLF/New Call”

    5.When the key Subtype is changed to “Speed Dial”, the corresponding information needed will list automatically, the “Value” is the number you need to do speed dial.

    6.When the key type is changed to “BLF/New call”, the corresponding information needed will list automatically, the “Value” is the number you need to monitor, the “Extension” is the pickup code used to pick up a call if needed.

    7.Press “OK” key to save the configuration.


    More

    ALE phones supported programmable key numbers and types:

    If still any issue you meet, please feel free to contact ALE support team for further support at support.alesip@al-enterprise.com.

    Supported Models

    8008 CE/8008G CE/8018 CE/8058S CE/8068S CE/8078S CE/H2 /H2 P/M3 /M5 /M7

    Firmware Version

    All version

  • Tested Wi-Fi Dongle List for ALE phones

    Issue Summary

    This FAQ shares the tested Wi-Fi dongle list for ALE phones


    Possible Causes


    How to Resolve


    More

    If still any issue you meet, please feel free to contact ALE support team for further support at support.alesip@al-enterprise.com.

    Supported Models

    8018 CE/8058S CE/8068S CE/8078S CE/M3 /M5 /M7

    Firmware Version

    1.53.31.4058 or higher version for 8018 CE/8058S CE/8068S CE/8078S CE

    2.11.01.1602 or higher version for M3 /M5 /M7

Demo Kit Application
Project Report
Demo Kit Application
Project Report
Support
Request for price